How To Request an Incident Explanation With BetterShield?
Ask the AI provider connected to WordPress to summarize one incident from its recorded evidence.
In BetterShield, an incident can offer a plain-language explanation when WordPress has a compatible AI provider.
What it does
BetterShield sends that incident’s recorded evidence to the provider, replacing account and file names with placeholders where the request requires it. The response summarizes the timeline and possible meaning. It does not change the incident or decide intent.
Step 1: Request an Incident Explanation
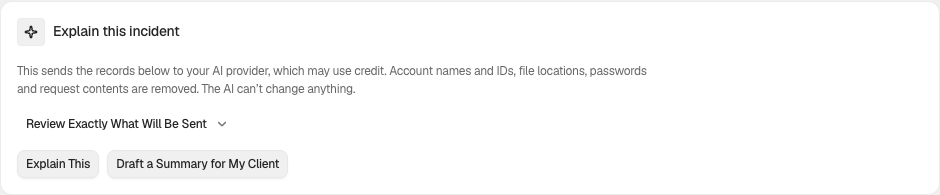
Use WordPress 7.0 or newer with a compatible provider connected to WordPress. Open BetterShield › Activity › Incidents, then select Review Timeline for the incident. Under Explain this incident, select Review Exactly What Will Be Sent before choosing Explain This or Draft a Summary for My Client. Your provider can charge for the request.
Recommended settings
Use the response to orient the review, then verify every important statement against the incident evidence and related activity.
What it can break and how to undo
The request is read-only, but selected evidence leaves the site for the connected provider. There is no site change to undo.
Final Outcome
The explanation should stay attached to the incident view and should describe only the evidence in that group. Usage appears under Settings › General › Plain-language explanations.
Related
- Read an incident’s evidence and related activity
- Review plain-language explanation usage
- What BetterShield contacts
This is how you can request an incident explanation with BetterShield.
Getting Stuck? Feel free to contact our Dedicated Support Team.