How To Configure a Security Baseline With BetterShield?
What to turn on after Quick Setup, in what order and why: your way back in, sign-in, the fixes, alerts, the log and file check, and assistants.
In BetterShield, this is our recommended baseline for the free plugin, in the order we would work through it once Quick Setup is done. Most of it lives under BetterShield › Protection, and the rest under BetterShield › Settings. Each step links to the doc that covers it in full.
What it does
Some protection starts at activation, and the rest waits for you: apart from refusing requests to cloud-metadata addresses, no hardening fix, required two-factor or passkey-only sign-in is switched on until you choose it.
| Protection | After activation |
|---|---|
| Sign-in attempt limits | On: 5 failures in 15 minutes pause that connection for 15 minutes |
| Block simple bots on forms (the hidden bot check) | On |
| Comment, password reset and sign-up limits | On |
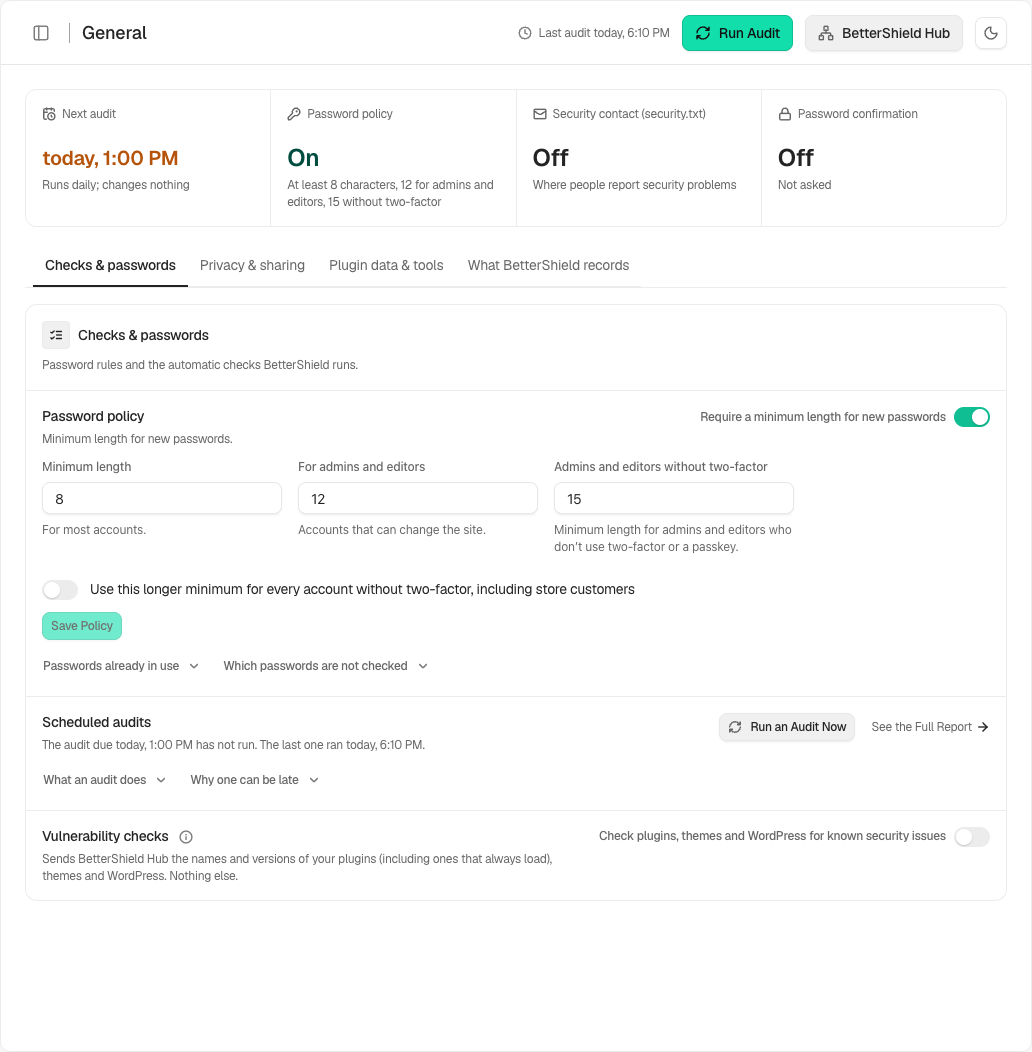
| Password policy | On: 8 characters, 12 for admins and editors, 15 for admins and editors without a second factor |
| Weekly summary and instant alerts for high and critical events | Off until you enable them; review the site’s admin email recipient |
| Activity log and the file check | Running |
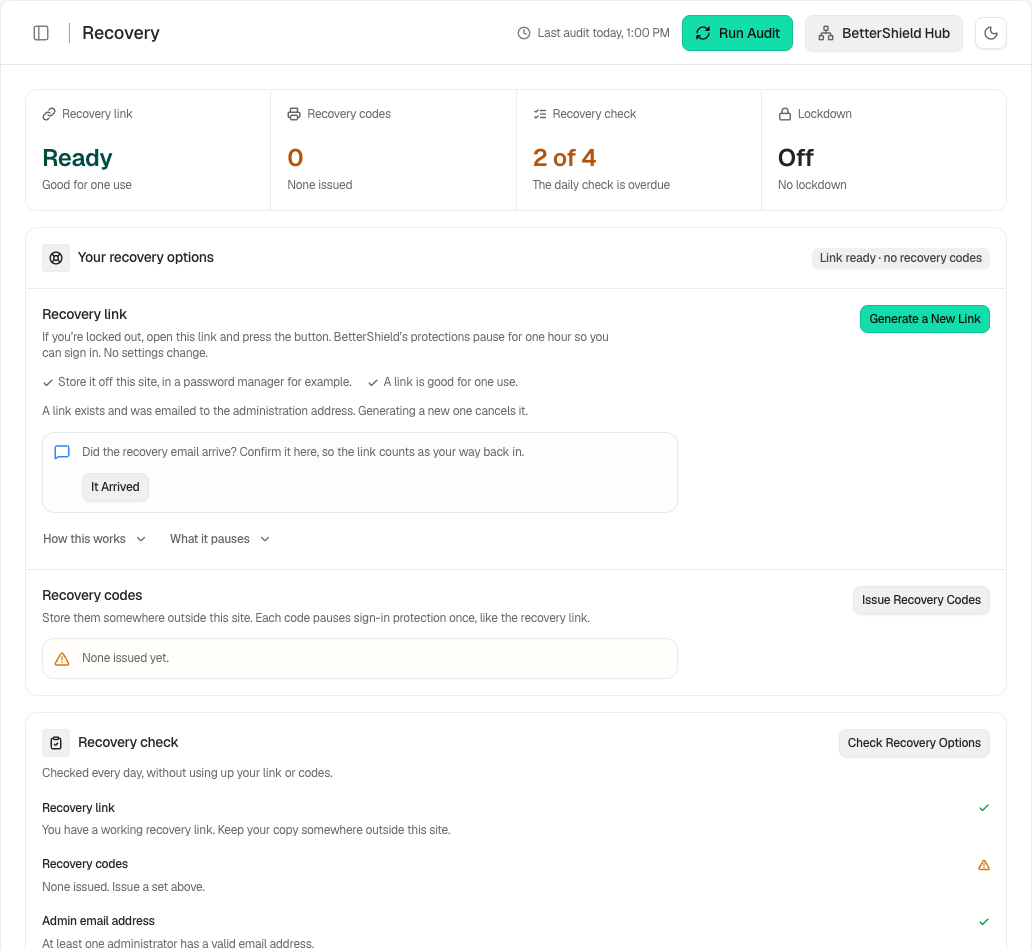
| Recovery link | Emailed to the admin address |
| Server detail protection | On |
| The other hardening fixes, required two-factor, passkey-only sign-in | Off |
| Usage sharing, BetterShield Hub, AI assistant access | Off |
Step 1: Your way back in, first
On BetterShield › Protection › Recovery:
- Keep the recovery link from your activation email somewhere off the site, such as a password manager. It works once and lasts 90 days. Generate a New Link replaces it and shows the new one once.
- Press Issue Recovery Codes and keep the eight codes off the site. They work when email does not.
- Turn on Send a weekly recovery email check if mail from this site has ever gone missing. It is off by default.
We put this first because every change to how people sign in (a sign-in fix, a required second factor, passkey-only sign-in) checks for a working way back before it applies. The first two also want recovery checked within the last day, and let you go ahead anyway, which is logged; passkey-only sign-in does not. See Set up recovery.
On a new install, instant alerts and the weekly summary start off. Turn them on in Quick Setup or Settings › Email alerts, review recipients and send a test alert. An update keeps an existing site’s saved choices.
Step 2: Sign-in
| Setting | Where | Default | Our advice |
|---|---|---|---|
| Sign-in attempt limits | Protection › Login & Access | On, 5 in 15 minutes, 15-minute pause that doubles on each repeat within a day, up to a day | Keep the defaults, unless another plugin keeps this job (Alongside another plugin). |
| Block simple bots on forms | Protection › Login & Access | On | Keep it on. |
| Proxy or Cloudflare | How this site sees you, Addresses of your CDN or proxy | Cloudflare not trusted, no proxies listed | Behind Cloudflare, press Yes, this site is behind Cloudflare. Behind another proxy, list its addresses under Addresses of your CDN or proxy, so each visitor is counted on their own. |
| Your own two-factor | Protection › Two-Factor | Off | Press Set up two-factor for your own account first. |
| Require two-factor of a role | Protection › Two-Factor | No roles, Grace period, in days 14 | Tick Administrator, and Editor where editors publish. |
| Passkeys | Protection › Two-Factor | None | Add a passkey for yourself (needs HTTPS). |
| Sign in with a passkey only | Protection › Two-Factor | No roles | Only for a role whose people all hold a passkey, and after your recovery codes are issued. |
| Sign out after idle (minutes) | Protection › Login & Access, Signed-in devices | 0 (off); 5 to 1440 | Leave off, unless people sign in on shared computers. |
| Sessions per account | Protection › Login & Access, Signed-in devices | 0 (off); up to 100 | Leave off, unless accounts should not be shared. |
Ask for a sign-in puzzle after wrong passwords and Tell account holders about sign-ins from a new network start off. Both are worth a look on a team site. See Login & Access, Proxies and Cloudflare, Require two-factor and Passkeys.
Step 3: The safe fixes, then the sign-in fixes
- Apply the five fixes Quick Setup offers, if you skipped them: File editor lock, WordPress version privacy, Folder listing protection, Username privacy and Browser protections, all on Protection › Hardening.
- On the same screen, add Remote publishing block (XML-RPC) if nothing on the site uses it (its Pingbacks only choice keeps the WordPress mobile app and Jetpack working), and Uploads code block and Private file protection where your server reads .htaccess (otherwise the row reads Not available here).
- Once the whole site is on HTTPS, turn on Strict HTTPS (HSTS) with Five minutes, to prove it works, and move to six months later.
- Under Signing in on Protection › Login & Access, turn on Leaked password check. Add App password block for Accounts that can manage this site unless a tool you use signs in with one.
Custom sign-in address is optional: in the plugin’s words, it makes the logs quieter, not the door stronger. If you use it, add Dashboard privacy for visitors, so /wp-admin/ does not hand the new address out. Rotate keys with Sign everyone out on demand at a quiet time, because it signs other accounts out. Where a fix offers Monitor first, use it before you enforce. See Hardening.
Step 4: Alerts
On BetterShield › Settings › Email Alerts, Send a weekly summary (Monday) and Email me about high and critical events as they happen are on, to the admin email until you name someone. Add the people who will act (up to 5 addresses); once any address is named, the admin email gets alerts only if it is on the list too. Then press Send a test alert. For planned work, use Planned maintenance rather than Mute all alerts. See Email alerts.
Step 5: The activity log and the file check
Both run from activation, with nothing to switch on. The log keeps 30 days; use Export CSV if you need a longer record. The file check compares WordPress core and directory plugins with the WordPress.org copies every hour in the background. Read the weekly summary, and act on Some WordPress or plugin files have been changed when it appears. See Activity log and File changes.
Step 6: Assistants, off until needed
Allow AI assistant connections on BetterShield › Agents › Connect starts off. We recommend leaving it off until you use an assistant. Turning it on also lets assistants see security info. On the Permissions tab, Let AI assistants see security info and Let AI assistants fix things are separate switches; turn on the second only when you want an assistant to apply fixes. See Connect an AI assistant.
Recommended settings
| Site | What we recommend |
|---|---|
| Blog or brochure site | The five safe fixes, Remote publishing block (XML-RPC), with Pingbacks only if you publish through the WordPress mobile app or Jetpack, Leaked password check, and two-factor for your own account. |
| Store (WooCommerce) | Require two-factor of a role for Administrator and Shop manager. Customers can set up two-factor under My Account › Sign-in security. Keep the bot check on: it covers the store’s account forms and adds nothing to the cart or checkout. Use Monitor first before App password block. |
| Membership or course site | Dashboard lock for customers and subscribers for Subscriber, after Monitor first. Keep Slow repeated sign-ups on, and consider a Sessions per account cap of two or three. |
| Agency or many sites | Me and a team in Quick Setup and two-factor required for Administrators. Set one site up, then export its settings and import them elsewhere under Settings › General, Move settings between sites. Connect each site to BetterShield Hub. Ultra adds temporary access and a client report. |
What it can break, and how to undo
- Remote publishing block (XML-RPC): with All of XML-RPC, the WordPress mobile app and Jetpack. Pingbacks only keeps both working.
- Browser protections: another site that embeds your pages in a frame.
- Custom sign-in address: anyone who only knows the old address. Keep the new one off the site; the recovery link restores the standard page.
- Sign everyone out on demand: everyone else signs in again, and sessions it ended stay ended.
- Strict HTTPS (HSTS): a browser that saw the header keeps insisting on HTTPS until the period ends, whatever you undo. Start with five minutes.
- Require two-factor of a role: after the grace period the dashboard waits until people set it up. Signing in is never blocked.
To undo a fix, turn its switch off on the screen it is on. To restore an earlier settings save, use Settings history on Settings › General. Locked out? See Locked out.
Final Outcome
Overview shows the score and grade, and Findings what is left.
- Nothing is limiting sign-in attempts (High) means BetterShield’s limit is off and no plugin it recognizes is limiting sign-ins.
- Failed sign-ins are not being counted, so password guessing is not stopped (High) usually means a proxy is not named.
- Your recovery options aren’t fully set up (Low) or The recovery link is close to expiring means your way back needs a look.
- Your test arrives as “Alert delivery test”, and the weekly summary on Monday.
This is how you can configure a Security baseline with BetterShield.
Getting Stuck? Feel free to contact our Dedicated Support Team.